Monday, January 15, 2018

10 Step for a Professional Makeup

Get a perfect makeup and professional results with the advice of Gato. Keep reading!

professional face makeup

1.Exfoliate your skin and apply a serum the night before so that your skin is luminous and firm before applying the base.

2.For a daytime make-up, always use natural light and for a night makeup, do it with artificial light and always in front of you, never with ceiling light that marks dark circles and volumes that can confuse you.
3.Mix the base with face cosmetics to make it lighter. The imperfections that are still visible can camouflage them later with a concealer.
4.There are three key areas that you must illuminate that are: center of the forehead and chin, under the eyes and the top of the bone of the cheekbone.
5.And three areas that you should sculpt with bronzing powder: both sides of the forehead towards the temples; under the bone of the cheekbone and under the line of the jaw.
6.Always use eyelash curler: not even the best eyelash mask lifts and curls as much as a professional curling iron. Also, do not believe the cheap cosmetics that break the eyelashes.
7.Beam balance between bright areas and mattes. For example, if your skin likes matte, use bright shadows or lipsticks and vice versa.
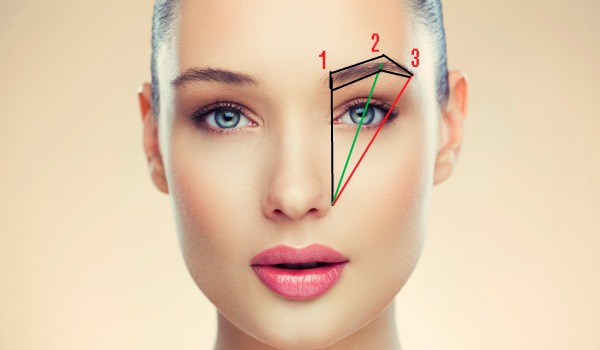
8.No makeup will look professional if your eyebrows are not perfect. If you are crafty, define them with a pencil; if not, it is enough that the combs and fixes with the brow mask Brow Drama so that you will give a professional face makeup.
9.Mattifies only the brightness of the center of the forehead, chin, tip of the nose and nasolabial fold. The rest of the glitters will help your skin look fresh and hydrated.
10.The nails are as important as the face so wear them in line with the makeup, or in a tone similar to that of the lips; natural if you want to subtract sophistication from your total look; or in a special tone if you want to brighten a natural makeup or too sober.

Friday, January 5, 2018

Step-By-Step Makeup for Valentine's Day

Valentine's Day is approaching, so I decided to give you the step by step instructions of this ideal makeup for Valentine's Day or a romantic date. The idea is to celebrate love, so the red lipstick comes in handy. It also makes your teeth look whiter, so your smile will look even more beautiful!

professional eye makeup

MAKEUP FOR A ROMANTIC VALENTINE'S DATE
1. Wash and prepare your face. Moisturize your skin, put on eye cream and apply a moisturizing balm for your lips. I also advise using a primer or pre-base, both for the eyes and the face.

discount makeup

2.Highlight your eyes with professional eye makeup. With a medium, brush applies bone-colored shadow to the entire eyelid. Then, with a smaller brush, apply cinnamon or brown shade (not too dark) to the fold. With a brush to delineate eyes, at an angle, apply dark chocolate shade in the line of the eyelashes and blend well. The idea is that there is no demarcation. Now delineate your eyes, either with the dark brown pencil or liquid eyeliner, but take care that the line is very thin. This is not a "cat eye" or cat look. Apply two layers of mascara that gives volume to your lashes.

wholesale makeup

3.Comb your eyebrows and fill them with pencil or shadow. Remember to use a tone equal or a little lighter than your natural eyebrows. If they tend to be rebellious, use a fixative gel. L'Oreal Paris, Bobbi Brown, Urban Decay and Ready to Wear have excellent eyebrow fixers.

4.Brighten your skin Apply concealer if you need it in the area under the eyes, around the nostrils, and around the lips to illuminate them. Now apply discount makeup base where it is necessary to standardize your skin tone. Blend well. If you are going to use cream highlighter, apply it now on the upper part of your cheekbones and on the bridge of the nose. Now apply a little bronzing powder under the cheekbones to refine the face and blend well. Finally, smile and on the cheeks apply blush in a peach or pink tone, depending on your skin tone.

5.Your red lips complete the look. Make sure you do not have dry lips or pellets before applying lipstick. You can delineate your lips in the same tone of your lipstick, or better yet, use a crayon that will serve to delineate and fill at the same time, like Bobbi Brown Art Stick. If you do not use a crayon, I advise you to use a brush to apply the lipstick correctly, because a strong tone does not forgive mistakes. To last longer, press your lips with a tissue paper (or Kleenex) and reapply the lipstick.

6.Seal the makeup. To make your makeup last all night, it is best to seal it with a layer of translucent powders (applied with a large brush) and then spray your face with a wholesale makeup like the Urban Decay or Mary Kay. This step really helps that you do not have to worry about touching up your makeup.

Thursday, January 4, 2018

Your Trendy Nails Come From Newspaper

We are living one of the best times for nails. The style, art, and decoration that we apply to them are much more varied, interesting, detailed and meticulous than other years.

It is no longer just about choosing the right color and painting the 10 or 20 identical nails. Now, the more creativity you make, the more praised your hands and feet will be.

One of the trendiest nail decor supplies online this season are nails with newspaper decoration. The technique to make them is very simple, and after a bit of practice, they will be like the experts.

They will need:
 A light-colored enamel can be pink, white or nude
 Transparent enamel
 The sheet of a newspaper
 Cotton
 Pharmacy alcohol

Let's do it!
First, we must prepare the nails as we always do with a nail drill machine. That they are clean, cut, filed and cuticle-free. A simple manicure to make the design look more.

Apply a transparent protective base to protect the nails, as you do before any enamel. Then apply the colored enamel. Try to make it a very clear color to highlight the printing of the letters. Let it dry completely with a UV lamb that is one of the important tools in your nail tool kit before moving on to the next point.

Cut small strips of newspaper that contain letters to print on your nails. Each strip will be placed on the finger, so calculate the sizes.

In a small container empty some alcohol. Dip a fingernail into the liquid and let it absorb for 10 seconds. Then place the strip of newspaper on the nails, as straight as you can so that lines are printed on your nails.

The paper should get wet with alcohol. Leave it for about 20 seconds or until you think the letters are well printed. Then remove the newspaper and let the letters dry. Apply a transparent base on top to give shine and you're done! Art in your nails.

Note: If you have some ink left on your skin, it will be removed when you wash your hands, or you can clean it with acetone.

Wednesday, January 3, 2018

Nail for Valentine 2018: Step by Step

In a previous post, we have already seen some of the best makeup trends for Valentine's Day, but just as important is the perfect nails on Valentine's Day. Then, our tutorial of Nails for Valentine, step by step with an example that without a doubt, you will love and love.

nail glue online

Nail for Valentine 2018: step by step
This nail tutorial will serve to show your hands properly and romantic for the day of lovers. They are cheerful and carefree nails full of hearts very simple to make without using nail glue online, but you have to have the patience to perform them.

Nail accessories for nails for valentine
Red enamel
Acrylic paint beige color.
White acrylic paint.
5/0 brush
Transparent enamel

How to make nails for valentine
1.We begin by giving a hand of the red enamel to each and every one of our nails.

2.Let it dry very well before giving the next red hand.

3.Second red hand on all the nails again. In this way, the nail polish will be much better.

4.Let dry again very well before going to the next step.

5.Let's start drawing hearts. With the nail accessories and the beige paint, we are making the outline of a large heart at one end of the nail.

6.It has to stay like that. Nothing happens if you do not make a perfect heart, practicing you will get to do them even with your eyes closed.


7.Fill the inside of the heart with the same color.

8.We do the same on the other end of the nail, but the little heart will be smaller.

9.We are doing this with all the nails.

10.These are the hearts that I have made in my fingers. What are beautiful? Let's keep going.

11.We change color. Now with the white and the brush, we make a diagonal line at the bottom, below the hearts.

12.The detail of the line makes your nails look much better.

13.Fill the hole we have left under the diagonal line making tiny little dots.

14.Now and when all the nails are the dots, we move to the area that is above the hearts. This time we will make dashed lines with white too.

15.In the area that is free above the dashed lines, we make dots again, but this time we will put two or three and more thick ones.

16.And finally, we put a thick point between the two hearts and another on the outside of the one that is higher upwards.

17.When everything is dry, we apply a coat of clear varnish to protect all the work.

Ready! Our professional nail tips are already perfect and we can celebrate Valentine's Day in style! We hope you spend a great day of lovers and do not hesitate to leave us your comments on how your nails have been for this day.

Beautiful Eye Makeup Guide

Eyes play a great role in your facial beauty. Your eyes reflect your emotions and attract attention as per you makeup. It is tough and tricky to decorate your eyes as per the season. Appealing eye makeup requires skill that requires practice, right cosmetic kits, and patience. In this article, we will learn how you can place the eye makeup with skill and art.

 cheap cosmetics

Step 1: Clean your eyes
Initially, it is important to clean your eyes as you need a perfectly clean canvas for your decoration. Try to wash your eyes with moderately warm water as hot water it may dry your skin around eyes. To remove any oily residue wash carefully.

 cheap cosmetics

Step 2: Identify your eyebrows
Eyebrows help to achieve the uncluttered makeup. Remove excess hair from your eyebrows and refine your eyes and gently comb your eyebrows. Mark the eyebrows by placing a light degree of your natural hair color and spray a small amount of hairspray to fix them.

 cheap cosmetics

Step 3: A primary makeup
After cleaning your eye our primary motive is that to make sure eye makeup goes on smoothly and stays till a certain period of time. Primary makeup generally contains Silicon that smoothens the lines and wrinkles around eyes that can make your makeup uneven. You can easily find cheap cosmetics at a drug store for your primary makeup.

 eye makeup set

Step 4: Adding the Shadow
Depending on the skin tone and your outfit add different dark palettes to the inner and outer corners of the eyes. This pattern is very adaptable and can be used with different eye shapes. Stiff brushes easily pack color onto your eye that helps in getting a darker and solid pattern. The key for adding depth to your eyes is to brush the dark color into your eyelid furrow. Use the small brush in your eye makeup set to get the color into tiny wrinkles without smirching it all over.
For the eyes to look bright and large add the lightest color to the center of the eyelid. Use a stiff brush for this step so that it will pack on the color and will make its covering perfect by covering the center of the eyelid with a light color.

 eye makeup set

Step 5: Blend all colors together
Gently and slowly blend each and every color within them so that entire looks absolutely svelte. Blending should be done with a soft brush.

discount cosmetics

Step 6: Lashes and Brows
Apply eyeliner to your eyelashes as closely as possible. The line could be darker and thicker as per your decoration. If you want to achieve more dramatic eyes put one layer of mascara immediately. Depending on your eye shape use different techniques for a different look. Start from the base to apply mascara to your lashes with your discount cosmetics. Slowly move to the end and slightly fiddle back and forth.
discount cosmetics

Friday, December 29, 2017

Nail Polish 2018; Fashion Nail Polish Trends

Want to follow all the popular trends of nail polish 2018 to look modern and elegant? Read this article about the novelties and ideas of nail polish 2018 that the designers offer us for next season.

professional nail art kit


Gel is the most elegant nail polish of 2018, combining beauty and practicality. It allows to create almost any design and make it resistant.

Thanks to the combination of lacquer and nail polish gel, the surface of the nails becomes very strong. This is a great opportunity to develop long nails if they are fragile because after applying gel nail polish with professional nail art kit they are guaranteed not to break. The gel can last up to a month, especially if the nails do not grow too fast. Eto will allow your hands to look perfect without any effort. The gel lacquer gives a much more intense color than conventional polishes due to its dense coat and shiny texture. You must choose the room and the specialist carefully so that your nails are as strong as possible. Sometimes, due to the long application or insufficient drying under the lamp. It is possible that the nail polish will not harden properly and then it will scratch or chip.

professional nail art kit


Nail polish 2018- different combinations
It is necessary to avoid excessive exposure to water. Water, especially warm and soft nail plate, and gel lacquer can come off. Do not try to remove the gel lacquer yourself, it is well attached to the nails. Trying to remove it yourself can damage your nails. The following color combinations will be fashionable, pale, almost transparent pink with raspberry. As neon green with emerald, peach with juicy orange, sand with intense yellow, salmon with scarlet, gray with purple. Cheap nail polish, made in one color, is also fashionable. It can be either a light gel of pastel tones of matte texture or a gel of brilliant neon tone.

Cheap nail polish


Nail polish trends 2018: metallic and matte nail polish
One of the most modern nail polish trends of 2018 is the matte surface of the nails, without gloss or nacre, which is advantageously seen on short nails. In the spring-summer season, choose to know, the texture of matte nail polish. The surface of metal, steel, gold, silver tones is also popular. The combination of matte nail polish and steel texture is a current trend in the art of nails. The wonders painted in matte pastel colors, such as soft beige, pink, blue, light gray with horizontal stripes or vertical metallic pasted will look interesting.

 cheap nail polish sets


The fashionable color of the metallic nail polish looks excellent on the nails. You can add shiny metal elements to any common nail design or take a base of gold, silver, and copper. For example, solid silver nails look great. They are quite unusual and bright, but they do not add bright tones and screams that may seem vulgar. If you choose this kind of cheap nail polish sets as the main tone, you should leave the nails in one color or choose a design with classic colors. Do not exaggerate with the brightness. Do not add nail polish based on the color of metal sequins and rhinestones. It will look redundant.

Tuesday, December 26, 2017

The Guide to Manage Our Face

The human face is the best identity he/she can have, it is the most vital channel to express thoughts, ideas, expressions, and emotions.It's human nature to look more attractive and beautiful, but the most important question arises here, Do we really give time to our face?
It's very easy to have a clean face that can help you to build up a good personality and boost up your confidence. There are many ways of cleaning the face. You can use many beauty accessories and products to clean your face. But do they really work to enhance our beauty?

 beauty accessories

Our strategy should be simple and durable. That is, we should spend some time washing and clean our face before going out to a party, function or meeting.
Some of the tips that could help you to clean your face better could be :
1. Use beauty accessories that suits your skin.
2. Find the ph value of the beauty products that you want to use.
3.Make a proper routine of washing your face.

 beauty accessories

The procedure that is very easy and suitable for most of us could be :
1. The first step is called as "cleansing". But if you wear a wholesale makeup, it is necessary for you to remove the makeup first. In this process, wash your face with a face cleanser or face wash with plenty of water, and use a soft towel to dry the water on your face.
2. The second step is called as "Scrubbing". Apply scrub all over the face, it helps to eliminate the dead skin cells which make your skin dull and dead. You can also use a paste of honey and sugar as a scrub and apply it to all over your face for 3-4 minutes.
wholesale makeup

3. The third step is the most crucial and important step in face cleaning. Face pack makes your skin soft by removing the excess oil and by moisturizing the skin hence improving the skin tone.
wholesale makeup

4. The last step is the " Moisturisation ". This process can be done before going to bed or any other time. It helps to get the moist skin back and preventing it to get dry and prevents rashes.
 electric face cleaning brush

In addition, we can also use an electric face cleaning brush to clean our face in order to clean our face completely. The experts say that some high-quality beauty products and beauty accessories can help to care for our face.

 electric face cleaning brush

The above procedure only takes about 25-30minutes of our crucial time. But it gives our face a beautiful glow and shine. If you want to become more beautiful, just follow the procedure.